
Step-by-step instructions for setting up a multi-container Docker hosting environment on an VPS (Ubuntu 24.04.4) with Nginx Proxy Manager reverse proxy.
Server specifications: 6 cores, 8 GB RAM, 256 GB SSD.
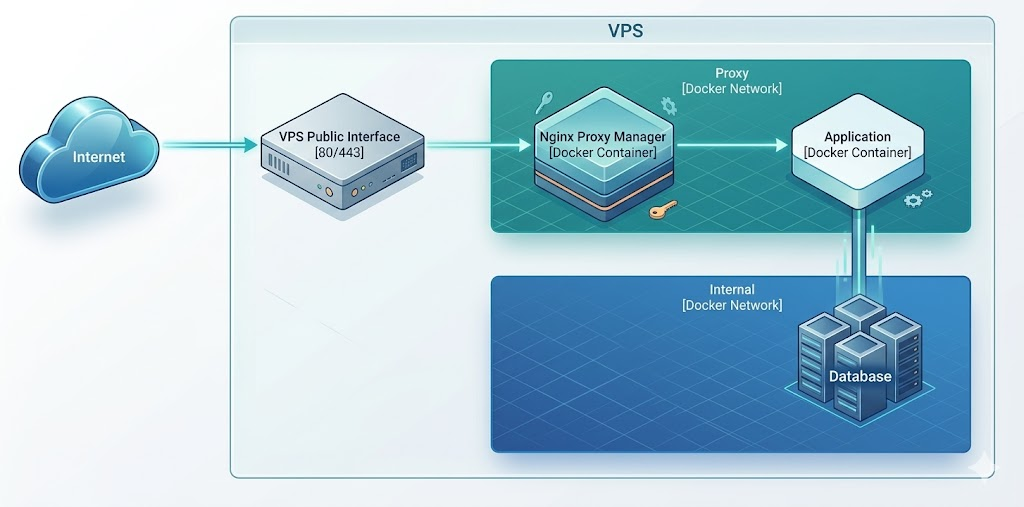
Architecture Overview
Before deploying, it is helpful to understand how traffic flows through this environment. External traffic hits the VPS and is securely routed by Nginx Proxy Manager (NPM). The proxy forwards traffic exclusively over a shared, internal Docker network to the target applications, ensuring containers are not unnecessarily exposed to the host network.
1. Initial Server Setup
1.1 Connect to your server
ssh root@YOUR_SERVER_IP
1.2 Update the system
apt update && apt upgrade -y
1.3 Create a non-root user
Do not run Docker as root.
adduser deploy
usermod -aG sudo deploy
1.4 Set up SSH key authentication for the new user
On your local machine:
ssh-copy-id deploy@YOUR_SERVER_IP
1.5 Harden SSH
Edit /etc/ssh/sshd_config:
sudo nano /etc/ssh/sshd_config
Set the following values:
PermitRootLogin no
PasswordAuthentication no
PubkeyAuthentication yes
Restart SSH:
sudo systemctl restart ssh
Important: Before closing your current session, open a new terminal and verify you can log in as the deploy user with your SSH key. If you lock yourself out, you will need Ionos console access to recover.
1.6 Configure the firewall
sudo ufw default deny incoming
sudo ufw default allow outgoing
sudo ufw allow 22/tcp    # SSH
sudo ufw allow 80/tcp    # HTTP
sudo ufw allow 443/tcp   # HTTPS
sudo ufw enable
Note: We purposefully do not open port 81 (the NPM Admin UI) in the firewall. We will use a secure SSH tunnel to access it.
1.7 Set the hostname and timezone
Set the hostname to your server’s fully qualified domain name (FQDN):
sudo hostnamectl set-hostname server.yourdomain.com
sudo timedatectl set-timezone Europe/London
Add the FQDN to /etc/hosts:
echo "YOUR_SERVER_IP server.yourdomain.com server" | sudo tee -a /etc/hosts
1.8 Enable automatic security updates
sudo apt install -y unattended-upgrades
sudo dpkg-reconfigure -plow unattended-upgrades
Select Yes when prompted.
2. Install Docker
2.1 Install Docker Engine
From here on, all commands run as the deploy user.
ssh deploy@YOUR_SERVER_IP
Install Docker using the official repository:
# Remove any old versions
sudo apt remove -y docker docker-engine docker.io containerd runc 2>/dev/null

# Install prerequisites
sudo apt update
sudo apt install -y ca-certificates curl gnupg

# Add Docker's official GPG key
sudo install -m 0755 -d /etc/apt/keyrings
curl -fsSL https://download.docker.com/linux/ubuntu/gpg | sudo gpg --dearmor -o /etc/apt/keyrings/docker.gpg
sudo chmod a+r /etc/apt/keyrings/docker.gpg

# Add the repository
echo \
  "deb [arch=$(dpkg --print-architecture) signed-by=/etc/apt/keyrings/docker.gpg] https://download.docker.com/linux/ubuntu \
  $(. /etc/os-release && echo "$VERSION_CODENAME") stable" | \
  sudo tee /etc/apt/sources.list.d/docker.list > /dev/null

# Install Docker Engine and Docker Compose plugin
sudo apt update
sudo apt install -y docker-ce docker-ce-cli containerd.io docker-buildx-plugin docker-compose-plugin
2.2 Add your user to the docker group
This avoids needing sudo for every Docker command:
sudo usermod -aG docker deploy
Log out and back in for the group change to take effect:
exit
ssh deploy@YOUR_SERVER_IP
2.3 Verify the installation
docker --version
docker compose version
docker run hello-world
All three commands should succeed. Remove the test container:
docker rm $(docker ps -aq) 2>/dev/null
docker rmi hello-world
2.4 Configure Docker to start on boot
sudo systemctl enable docker
sudo systemctl enable containerd
3. Prepare the Directory Structure
3.1 Create the base directory
sudo mkdir -p /opt/docker
sudo chown deploy:deploy /opt/docker
3.2 Initialise a Git repository
This makes the entire setup reproducible. You can push this to a private remote for off-server backup.
cd /opt/docker
git init
Create a .gitignore to exclude runtime data and sensitive environment variables, but keep compose files and example templates:
cat > .gitignore << 'EOF'
# Ignore volume data (backed up separately)
*/data/
*/db_data/
*/letsencrypt/
*/logs/

# Ignore sensitive environment variables
**/.env

# Keep compose files and config templates
!**/docker-compose.yml
!**/docker-compose.override.yml
!**/.env.example
EOF
3.3 Create the shared Docker network
All containers that need to be reached by the reverse proxy will join this network:
docker network create proxy
4. Deploy Nginx Proxy Manager
4.1 Create the directory and compose file
mkdir -p /opt/docker/nginx-proxy-manager
Create the compose file. Notice that port 81 is bound exclusively to 127.0.0.1. This prevents the administrative interface from being exposed to the public internet, enforcing a secure connection method.
cat > /opt/docker/nginx-proxy-manager/docker-compose.yml << 'EOF'
services:
  npm:
    image: jc21/nginx-proxy-manager:latest
    container_name: nginx-proxy-manager
    restart: unless-stopped
    ports:
      - "80:80"
      - "443:443"
      - "127.0.0.1:81:81"
    volumes:
      - ./data:/data
      - ./letsencrypt:/etc/letsencrypt
    networks:
      - proxy
    healthcheck:
      test: ["CMD", "/usr/bin/check-health"]
      interval: 10s
      timeout: 3s

networks:
  proxy:
    external: true
EOF
4.2 Start Nginx Proxy Manager
cd /opt/docker/nginx-proxy-manager
docker compose up -d
Verify it is running and healthy:
docker compose ps
5. Configure Nginx Proxy Manager
Because we strictly bound the admin port to 127.0.0.1 and kept it closed in the firewall, you must use an SSH tunnel to access the UI. This provides a zero-trust approach to administrative access.
5.1 Create an SSH Tunnel
Run this command on your local machine (your laptop/desktop), replacing YOUR_SERVER_IP with your actual server IP:
ssh -L 8181:localhost:81 deploy@YOUR_SERVER_IP
Leave this terminal open.
5.2 Access the admin UI
Open your browser and navigate to:
http://localhost:8181
5.3 Initial Configuration
Log in with default credentials:
- Email:
admin@example.com - Password:
changeme
You will be prompted immediately to change these. Use a strong, unique password, and update your email and name details.
6. Deploy and Expose Your First Application
The mental model for adding an application always follows the same flow: deploy the container to the internal network, point your DNS to the server, and route the traffic via NPM.
6.1 Create the application directory and compose file
mkdir -p /opt/docker/app-example

cat > /opt/docker/app-example/docker-compose.yml << 'EOF'
services:
  app:
    image: nginxdemos/hello:latest
    container_name: app-example
    restart: unless-stopped
    networks:
      - proxy

networks:
  proxy:
    external: true
EOF
Note: There is no ports section. The app is not exposed to the internet directly. Only NPM can reach it.
6.2 Start the application
cd /opt/docker/app-example
docker compose up -d
6.3 Point your domain to the server
In your DNS provider, create an A record pointing to your server:
Type: A
Name: app-example          (or whatever subdomain you want)
Value: YOUR_SERVER_IP
TTL: 300                   (5 minutes)
6.4 Add the proxy host in NPM
- Ensure your SSH tunnel from Step 5.1 is still active, and open the NPM admin UI (
http://localhost:8181). - Go to Hosts > Proxy Hosts > Add Proxy Host.
- Fill in the Details tab:
- Domain Names:
app-example.yourdomain.com - Scheme:
http - Forward Hostname / IP:
app-example(This is thecontainer_namefrom your compose file) - Forward Port:
80(The internal port the app listens on) - Block Common Exploits: Enabled
- Domain Names:
- Go to the SSL tab:
- SSL Certificate: Request a new SSL Certificate
- Force SSL: Enabled
- HTTP/2 Support: Enabled
- Email for Let’s Encrypt: your-email@example.com
- Agree to TOS: Yes
- Click Save.
Verify by visiting https://app-example.yourdomain.com in your browser.
7. Adding More Applications
7.1 Architecture for Database-Backed Applications
When an application requires a database, create a dedicated internal network. This ensures the database is physically unreachable from the Nginx proxy and the public internet.
7.2 Example: Application with a database
services:
  app:
    image: your-app:latest
    container_name: myapp
    restart: unless-stopped
    env_file:
      - .env
    depends_on:
      db:
        condition: service_healthy
    networks:
      - proxy
      - internal

  db:
    image: postgres:16
    container_name: myapp-db
    restart: unless-stopped
    env_file:
      - .env
    volumes:
      - ./db_data:/var/lib/postgresql/data
    healthcheck:
      test: ["CMD-SHELL", "pg_isready -U myapp"]
      interval: 5s
      timeout: 3s
      retries: 5
    networks:
      - internal

networks:
  proxy:
    external: true
  internal:
    driver: bridge
7.3 Using environment files securely
We previously configured Git to ignore .env files. Store your sensitive values here:
cat > /opt/docker/myapp/.env << 'EOF'
POSTGRES_USER=myapp
POSTGRES_PASSWORD=CHANGE_ME_TO_A_STRONG_PASSWORD
POSTGRES_DB=myapp
EOF

chmod 600 /opt/docker/myapp/.env
Create an .env.example with placeholder values to commit to your repository instead:
cat > /opt/docker/myapp/.env.example << 'EOF'
POSTGRES_USER=myapp
POSTGRES_PASSWORD=
POSTGRES_DB=myapp
EOF
8. Backups
8.1 Create a backup script
This script backs up volume data, Let’s Encrypt certificates, environment files, and infrastructure files.
cat > /opt/docker/backup.sh << 'SCRIPT'
#!/bin/bash
set -euo pipefail

BACKUP_DIR="/opt/backups"
DATE=$(date +%Y-%m-%d_%H-%M-%S)
BACKUP_PATH="${BACKUP_DIR}/${DATE}"

mkdir -p "$BACKUP_PATH"

# Back up all volume data (excluding database data dirs which need dump)
echo "Backing up volume data..."
for dir in /opt/docker/*/; do
    app_name=$(basename "$dir")
    if [ -d "${dir}data" ]; then
        tar czf "${BACKUP_PATH}/${app_name}-data.tar.gz" -C "$dir" data/
    fi
done

# Back up NPM Let's Encrypt config specifically
echo "Backing up Let's Encrypt certificates..."
tar czf "${BACKUP_PATH}/npm-letsencrypt.tar.gz" -C /opt/docker/nginx-proxy-manager letsencrypt/ 2>/dev/null || true

# Back up all .env files
echo "Backing up environment files..."
find /opt/docker -name ".env" -exec tar czf "${BACKUP_PATH}/env-files.tar.gz" {} +

# Back up compose files
echo "Backing up compose files..."
find /opt/docker -name "docker-compose.yml" -exec tar czf "${BACKUP_PATH}/compose-files.tar.gz" {} +

# Clean up backups older than 30 days
find "$BACKUP_DIR" -maxdepth 1 -type d -mtime +30 -exec rm -rf {} +

echo "Backup complete: ${BACKUP_PATH}"
SCRIPT

chmod +x /opt/docker/backup.sh
8.2 Database backups
For any application with a PostgreSQL database, add a dump step to your script. Example:
# Dump a specific database container
docker exec myapp-db pg_dump -U myapp myapp | gzip > "${BACKUP_PATH}/myapp-db.sql.gz"
8.3 Schedule the backup and sync off-server
Backups on the same server are not enough. Push them off-server (e.g., using S3 or rsync). Schedule the script in cron:
crontab -e
Add:
0 3 * * * /opt/docker/backup.sh >> /var/log/docker-backup.log 2>&1
9. Maintenance
9.1 Updating containers
To update a specific application:
cd /opt/docker/app-example
docker compose pull
docker compose up -d
9.2 Pin image versions in production
Once your stack is stable, pin images to specific versions instead of latest to prevent unexpected breaking changes.
# Instead of this:
image: jc21/nginx-proxy-manager:latest

# Use this:
image: jc21/nginx-proxy-manager:2.12.1
9.3 Cleaning up unused resources
Docker accumulates unused images, networks, and volumes over time:
# Remove unused images, networks, and build cache
docker system prune -f
10. Troubleshooting
Container cannot connect to another container
Verify both containers are on the proxy network:
docker network inspect proxy --format='{{range .Containers}}{{.Name}} {{end}}'
NPM shows “502 Bad Gateway”
- Check the target container is running:
docker ps - Verify the container name matches the Forward Hostname in NPM.
- Verify the port number matches what the app listens on inside the container.
SSL certificate fails to issue
- Confirm DNS resolves to your server:
dig yourdomain.com +short - Confirm ports 80 and 443 are open:
sudo ufw status - Let’s Encrypt has rate limits — if you have requested too many certificates for the same domain, wait an hour.
Appendix: Disaster Recovery & Automation
This bootstrap script rebuilds the entire environment on a fresh Ubuntu 24.04 server.
Recreation procedure
- Provision a new Ubuntu 24.04 VPS.
- Perform initial server setup (section 1).
- Clone your Git repository to
/opt/docker/. - Restore
.envfiles and volume data from your off-server backups. - Run the
./bootstrap.shscript below. - Update DNS records to point to the new server IP.
Bootstrap Script (/opt/docker/bootstrap.sh)
cat > /opt/docker/bootstrap.sh << 'SCRIPT'
#!/bin/bash
set -euo pipefail

echo "=== VPS Docker Bootstrap ==="
echo "Run this as the deploy user on a fresh Ubuntu 24.04 server."
echo ""

if [ "$(id -u)" -eq 0 ]; then
    echo "ERROR: Do not run as root. Run as the deploy user."
    exit 1
fi

echo "--- Installing Docker ---"
sudo apt update
sudo apt install -y ca-certificates curl gnupg

sudo install -m 0755 -d /etc/apt/keyrings
curl -fsSL https://download.docker.com/linux/ubuntu/gpg | sudo gpg --dearmor -o /etc/apt/keyrings/docker.gpg
sudo chmod a+r /etc/apt/keyrings/docker.gpg

echo \
  "deb [arch=$(dpkg --print-architecture) signed-by=/etc/apt/keyrings/docker.gpg] https://download.docker.com/linux/ubuntu \
  $(. /etc/os-release && echo "$VERSION_CODENAME") stable" | \
  sudo tee /etc/apt/sources.list.d/docker.list > /dev/null

sudo apt update
sudo apt install -y docker-ce docker-ce-cli containerd.io docker-buildx-plugin docker-compose-plugin

sudo usermod -aG docker "$USER"
sudo systemctl enable docker containerd

echo "--- Creating shared network ---"
sudo docker network create proxy 2>/dev/null || true

echo "--- Starting NPM ---"
sudo docker compose -f /opt/docker/nginx-proxy-manager/docker-compose.yml up -d
sleep 10

echo "--- Starting Applications ---"
for dir in /opt/docker/*/; do
    app_name=$(basename "$dir")
    if [ "$app_name" = "nginx-proxy-manager" ]; then
        continue
    fi
    if [ -f "${dir}docker-compose.yml" ]; then
        echo "Starting ${app_name}..."
        sudo docker compose -f "${dir}docker-compose.yml" up -d
    fi
done

echo "=== Bootstrap complete ==="
SCRIPT

chmod +x /opt/docker/bootstrap.sh